Quick sales module: “Menu”
What can we do from the quick sales module menu, and what does it provide access to?
When you launch IcashPos.exe from the pos folder, enter a user password and the program will take you to the home screen. The menu is in the upper left corner, behind the button with an icon of three horizontal lines. Selecting it opens the menu shown on the left. This menu connects the quick sales module to all peripheral devices (fiscal device, non-fiscal printer and electronic scales). Once connected, you can control the fiscal device from the quick sales module by sending commands for it to execute. This article provides detailed information about every button in this menu. If some of the described buttons are missing, you most likely do not have permission or the cash register is not connected.- Quantity check – with an internet connection, you can check quantity of an item in stock and its selling price.
- Cash paid in—when connected to a fiscal device, you can record cash paid in and paid out. Read the guide.
- Cashier reporting – a list of all operations performed by the active user, with an option to print an A4 report.<
- To the online platform – redirects to the inventory account's online home page.
- Reversals – option to reverse a sale. Watch the video.
- Daily reports– running X and Z reports. Read the guide
- Fiscal memory report by date – printing a monthly or annual report. Read the guide
- Operator report – prints an X report for the active user from the fiscal device, with the number of sales, reversals, discounts and accumulated amounts.
- Receipt duplicate – the fiscal device prints a duplicate of the last fiscal receipt issued. You cannot duplicate a non-fiscal receipt, although some fiscal devices can be configured to do so.
- Open cash drawer—if the fiscal device is connected to a drawer, this button opens it. When setting up the fiscal device connection, you can configure the drawer to open automatically after a transaction is completed.
- Settings —opens the settings menu, where you can pair peripherals with the quick sales module, select payment methods and arrange dining rooms with tables.
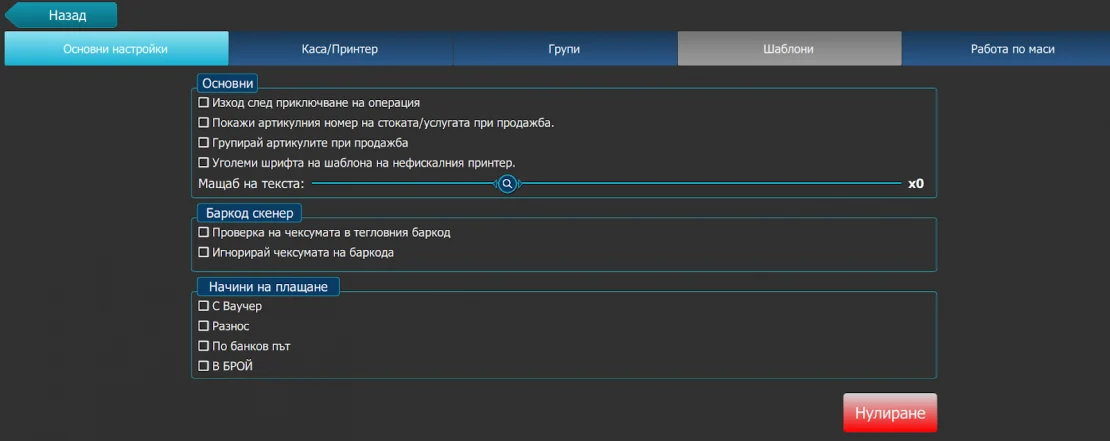
General settings
-
- Exit after completing an operation – after printing a fiscal receipt, the program returns to the home screen, where you must enter your access password; useful for restaurants where several waiters enter orders one after another.
- Show the goods/service item number during a sale– after selecting an item, its item number also appears on the line below its name.
- Group items during a sale—if not selected, each unit/quantity of an item is displayed and printed on a separate receipt line.
- Font size in the non-fiscal printer template – increases the text size printed by non-fiscal printers (kitchen printer).
- Text scale– the scroll wheel increases/decreases the text scale in settings.
Barcode scanner
-
-
- Checksum verification in the weight barcode;
- Ignore barcode checksum: some barcode scanners generate prefixes and suffixes, which this checkbox ignores. It has not been tested with all scanners.
-
Payment methods: Select payment methods to display in the 'Payment' menu. They can be reconfigured.
-
-
- cash;
- with a voucher;
- by card.
-
Reset– this button deletes user settings, so you will need to reconnect peripheral devices.
Cash Register/Printer—opens the peripheral device connection wizard.
Groups– displays all item groups. You can hide groups so they do not appear in the program.
Table service – available in the PRO package—read more about the restaurant module.
Remote support software
Starts a remote support program through which a support team member can access the client's computer. An internet connection is required. After starting the program, a window should open on your screen (see the image below left). Once a member of our team accepts your request, you must grant them permission (see the image below right).
Information
Here you will find the support phone number, your inventory account number, location name and cash register model as entered in the system, and the name of the user logged into the program.
See also the videos on our YouTube channel, sell more easily.